Monday, 22 October 2012

It's Getting Dark And It's Getting Cold And The Nights Are Getting Long..

This is definitely my favourite time of year. It's not too cold, so you can still go for long walks and do things outside (: Yet, it's just cold enough to wear lots of lovely hats, scarves and coats! I've seen so many gorgeous coats this year, and although I've got enough coats to not justify buying another, I thought I'd compile a few of my faves into a post. I've put a mix of macs and full-on coats in here, because Autumn lends to both! So if you're looking for a coat as it's getting a bit chilly, do read on..


So there's a little bit of leather here and there, mostly in the form of leather sleeves or lapells, which I love. And most of the shapes are quite boxy-blazer style coats, rather androgynous, but this shape looks great with black skinny jeans and a great pair of boots!
Heritage is also a huge trend this Autumn/Winter, so the tweed fabric in these coats is bang on trend, and will also keep you really warm (: In my honest opinion, although I do love a good faux fur collar, I actually prefer no. 3 and no. 7 without the fur. They're both detachable collars though, so all is well!
Which ones do you like?

I've been quite busy this week with work, and when I'm not working I'm travelling over to see the chap. Found time to go see Bastille last week in London though, great band, so check them out (: And supporting was a girl called Jade Brown (amazing chick) & a band called Swiss Lips (who knows, they were rather MGMT-esque though, pretty good). Followed with a gorgeous Pizza Express in Camden, who knew?!


Sunday, 14 October 2012

Fur-bulous!

I recently spent the day working at Hobbs in Walton on Thames, which was obviously lovely but a very long day. So naturally, on my hour-long lunch break, I did a spot of shopping (: 
I bought this fur collar from H&M for £14.99 but couldn't find it on the website. But it was definitely worth the money, because it makes all my coats and jackets look completely new!!

Before:


 After:

Before:

After:
*'Scuse the awkward arm, I don't know what it's doing there.

I also bought these boots from H&M. So in love with them, and they're super comfy. I've had them about a week now so they're not completely clean & new-looking anymore. But I'm dead chuffed with them. There's a few versions knocking like these from like these from Topshop.

My h&m beauties (:


Oversized contrasting collar blazer - £4 Portabello Rd Market
Sleeveless Denim Shirt - £1 (car boot)
Denim Biker - £7 (brand new from H&M at a car boot)
Fur Collar & Boots - both H&M


I'd be lusting after the leather biker with a fur collar from Topshop for a while, but with my car MOT next week I've had to compromise and make my own cheapskate version! Which I actually kinda like (:

On my little lunchbreak shopping spree in h&m I also bought chunky knit socks to wear with my boots, and some lovely little bits in the sale including a white pencil skirt and a pair of sunglasses for summer & some cosy grey wool shorts for winter. I'll do a few outfit posts soon I hope, having a chap around pays off when you need someone to snap what you're wearing! Taking these photo's of myself today was a nightmare, I'm awful at it, and today I look like I should be living under a bridge hence minimal snaps of the face.

Had a nice day yesterday with the boy doing a charity shop crawl in our local town. Oli got a Kooks album which he purchased for £1.99 & then we spent ages in the cute little record shop eyeing up the vinyls. Good weekend.

xx

Monday, 8 October 2012

Product Review: Garnier BB Cream


Before buying this product, I was using Rimmel's 'Lasting Finish 25 Hour' foundation in Ivory, because it's their lightest shade (I'm pale as a sheet) & I've had it before, just got comfortable & didn't have time/money to experiment with anything else. But when my last bottle ran out, I decided I would, because although it was quite a good & reasonably priced foundation, I found it slightly too thick and heavy for me. My skin always felt quite clogged up by the end of the day!
I'd heard quite a bit about BB cream before & I had been sent a tester of this in the post, so I thought I'd give it a go. It was on offer at the time, and I liked the idea of it combining a few products into one :)

I went with the 'Light' shade, and I've been using it for about a month now. It definitely does have a much lighter coverage, and my skin definitely feels a lot healthier, more moisturised than plastered :) So I would recommend this product for that, but the downside for me, is that its just a little toooo light, I really like the idea of a BB cream, I think I just want one with slightly more coverage because I feel like I'm using far too much of it in some places! And it does leave my skin a little more shiny than I'd hope, so powder is needed as I prefer my skin to have more of a matte finish!
If anyone can suggest a really good BB cream that'd be so helpful :) Just gotta wait for this one to run out now.


Tuesday, 2 October 2012

DIY: Marble Effect Nails!

 You will need

  • various coloured pretty nail polishes
  • white nail polish
  • a mug of room temperature water (preferably not in your mums best china)
  • cotton buds
  • nail varnish remover
  • a cocktail stick or sewing needle
Okay prepare for it to be veryy messy! You'll need to do each of these steps quite quickly so that the nail varnish doesn't dry in the water. And don't give up too quickly, it may take a few tries before you get it!

So start by painting each of your nails white. This leaves a nice background base colour for the marble effect & it does look better.
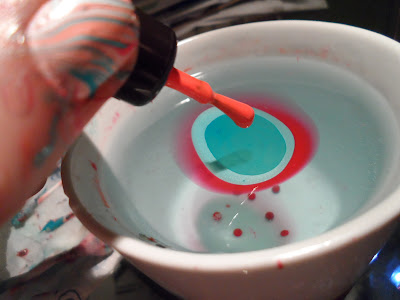
Get your mug of room temperature water & hold the brush above it, allowing a drop of nail varnish to fall in. This should spread out across the water. Inside each colour, add another drop until it starts to look like this. Do this about 5 or 6 times!

Next, using the cocktail stick/sewing needle/other pointy apparatus, carefully swirl the drops to make a pattern. Keep it simple, and remember don't rush, but be quite quick as it will dry!
If it dries to much it won't swirl very well & might look like this. If so, dont worry, get your finger in there & if it doesnt work, try again. To clear the mug & start a new finger, use the cotton bud to gather it all to the edge & it will lift out easily.

(Haven't got a picture for the next part, but once you've made your swirly, marble effect in the water, rest your finger nail upside-down over the pattern, slightly submerged in the water & lightly blow at the excess (to make it dry|). Take your finger out and allow it to dry. Do all 10 nails, allowing enough time for them all to dry.
It should look something like this....
Next is the clean-up operation. Once you've done the above steps to all your nails, and allowed them enough time to dry, you need to wipe the nail polish off of your fingers. Do this using cotton wool pads/tissue and cotton buds coated with nail varnish remover. The cotton buds are especially effective at cleaning around the nail, so that you don't take any of the design off the nail! 

And here's the finished product! Comment if you have any questions or anything. Go here if you wanna watch a video that breaks it down a bit slower!

I was actually meant to have this post up a few days ago, but works been hectic & I've been out & about with friends and the chap :) But I'm on top of things, and been brainstorming for the blog & scouting magazines and shops n' stuff for inspiration. So there's plenty of posts comin' your way!

P.S Thanks Mevans for helping me out with this one :) utter babe.